 Number 274 - March 2006 |

|
| File Management | |
|
By Jack Wilfore, Hilton Head Island Computer Club, South Carolina | |
|
Do you find that when photos get transferred from your camera to the computer, you feel you have lost control? For now, let's see if we can't gain back just a little of that control. When photos transfer from your camera to your computer, it's really important for you to know exactly where they go and where they get filed. There is nothing more frustrating than having your photos or other images or documents, or letters or scans get filed in your computer, and then you can't find them later. FILE MANAGEMENT This brings us to the subject of this article, File Management. Let's begin with the thought that your computer is nothing more that a big filing cabinet. Now its up to you to decide where and how to organize your files on your computer, just as it is with the file cabinet in your office. DISK DRIVES Before we get to actually managing your files, a brief review of how your computer stores data. Computers store data on drives, some drives are inside the computer and some may be outside or external to the computer. You probably already know that the C drive stores everything inside the computer. It is the heart and soul of your computer, and when you have a disk crash, its usually your C drive that goes, and you are out of business. Other drives may include an A drive for use of a floppy disk, and a D drive designated as CD-ROM drive which is for your CD's. Other external drives, also get assigned letter designations, and could include removable or external drives such as zip drives, or memory cards, or docking stations, or cameras, etc. If you left-click on the My Computer icon on your desktop, you can see these disk drives. You can also view what's on each drive by using your left mouse button to double-click on the A, C, or D icon There is one very important icon I want to point, when you are looking at Windows. The top bar (usually blue) across the top of a window is the Title Bar, the next bar down on the above window is a Menu Bar, and the third bar down is the Task Bar. On this screen shot, I want to point out one very important icon, the UP ONE LEVEL icon within the red circle, which usually looks like a folder with an up arrow. Get familiar with and use this icon to move around within your drives, or file cabinet. Try it! If you left mouse click that UP ONE LEVEL icon, the next window you see is the Desktop. Within the Desktop window, you can see the My Documents folder, which is the cornerstone of the file management structure. FILES, FOLDERS AND THE FILE CABINET I like to think of drives as file cabinets. They store electronic items such as documents, photos, images, spreadsheets, programs etc. Drives may have individual files (usually not a very good idea), and folders which usually contain a collection of files on a particular topic or a particular use. Recall that the C drive stores everything. Now as these files come in, we just can't let them go anywhere, this is where we can actually put them into an appropriate folder of our choice. And this is how you will get your file cabinet organized. Let's review two key items: Folders provide that organizational structure to a disk drive, just as they do in a file cabinet. First, you will put labeled folders into your cabinet/drive. Each folder will have a name. When you view the contents of a disk drive, folders are normally listed in alphabetical order. New folders can be created by right clicking on your desktop, and selecting New > Folder. The new folder appears on your desktop with the blue title where you can now type the name you have selected for that folder. These folders can now be dragged and dropped, wherever you want them. Files can and usually are put inside folders. This is where you will put your documents, your photos etc. In order to be able to find your documents later within an overstuffed folder, you give each document a unique name. On a PC, it is wise to use the following naming conventions for both folders and files: A file name is made up of two parts: (1) the name of the document and (2) the file extension which is usually assigned by the computer. If you don't see the file extensions in Windows XP, go to Desktop>Tools>Folder Options>View Tab and then unclick Hide extensions for known file types. You may name a file anything you wish (with some punctuation limitations), but it is preferable to name a file something you are likely to remember later. File names should be no longer than 8 characters whenever possible. Although Windows (and Mac) allow longer file names, you may get in problems while transferring files to other computers if you use longer file names. Also, use only letters and numbers in your file names. Special characters like "-", "/", "&", or blank spaces must be avoided in the file name. The second part of a file name is the extension. In the file text.doc, the word text is the file name and the .doc is the extension, identifying this as a Word document. A period always separates the two. The extension identifies what kind of a document you have. Some examples of file extensions are: .txt : plain text .doc : Microsoft Word Document .htm or .html : Web document .gif, .jpg, .bmp, tif, : images .ppt : PowerPoint Presentation THE STRUCTURE The File Management structure has a tree type organization or is hierarchial. And, you have the ability to set up that structure just as you would with the file cabinetin your office. Here is a graphic of one such structure: 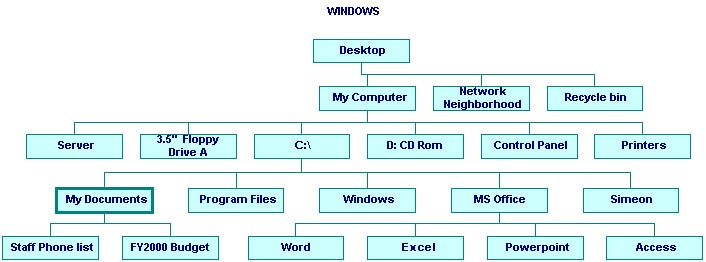
|
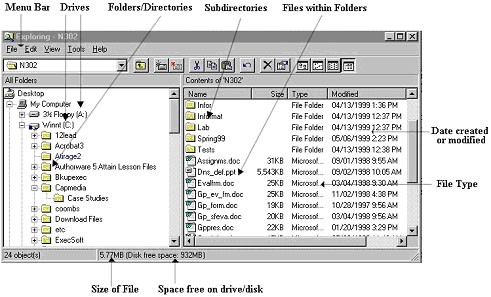
(Start > Programs > Accessories >Windows Explorer) is one way of looking at the internal file structure of your computer. The following screen capture shows many parent folders, also known as directories, with sub-directories (or sub-folders) and then files expanding beneath them. 
In this example, clicking the plus sign beside My Documents expands the files and additional subdirectories inside, or beneath My Documents. Clicking the minus sign collapses the sub-directories and files. 
To clarify how this new knowledge can help, when photos are transferred to your computer, whatever the transfer method might be, somewhere you will be asked to decide where do you want these photos to go? Sometimes the program will want to put your photos in either 1) a folder it creates, sometimes named with today's date or 2) into a folder which already exists perhaps as part of your camera software. If this is your preference, make note both the folder name and its location or path. Sometimes the program will ask you and then you can browse and select the destination folder of your choice. In my case, I created a special folder called from camera and located that folder in My Pictures, which is in My Documents, which is on my Desktop. Every time I do a photo transfer, I make sure the pictures are going to the from camera folder. I can decide later which photos to keep and where I want to store the keepers. Either way, you should now be able to sketch out on apiece of paper, ahead of time, exactly where your photos are going, which was the objective of this article. If you have any questions, comments, suggestions, please feel free to send Jack an email at: jwilfore@hargray.com More information on the subject of File Management is readily available on the Internet, especially from academic sources. Some of the material for this article has been extracted and credit is due these four excellent references: Furman University's File Management or Where Did It Go? http://facweb.furman.edu/~pecoy/mfl195/tutorial/ Duke University's Window's Explorer: Managing Your Files http://www.duke.edu/~dhewitt/tutorials/explorer/explor.html University of Virginia File Management http://www.itc.virginia.edu/desktop/docs/fms/pc/structure.html#hierarchy There is no restriction against any non-profit group using this article as long as it is kept in context with proper credit given the author. The Editorial Committee of the Association of Personal Computer User Groups (APCUG), an international organization of which this group is a member, brings this article to you. |
|
Number 274 - March 2006
|
|