 Number 302 - July 2008 |

|
| Using the VuPoint FS-C1-VP Digital Film Scanner with Photo Impressions 6 Software | |
| by Bob Thomson, Tacoma Open Group for Microprocessors | |
|
As a longtime computer user, I'm ashamed to admit it but, I didn't do any research on this. I saw an advertisement in the newspaper for this package and was interested. Why? Like a lot of you, I had hundreds of old slides and color negatives stashed away gathering dust. I never view them any more because getting out the projector and setting up the screen is too much trouble. Besides anyone who would want to see them would have to come to my house to view them. It would be much easier to be able to view them on their own desktop computer screen. If I could capture them as JPEGs, the images could be put on a CD or a DVD and distributed to interested parties for viewing either on their computer or perhaps, if they have a DVD reader, on their TV screen.
So I ordered the package advertised at $99. It contained: 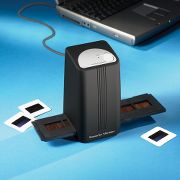 If your computer is a few years old, like mine, and does not have a USB2 port, you must have one installed to use this device. I was having some other work done so I had a card with two USB2 ports installed in my Windows XP machine. By the way, this software and device are advertised as for XP only, not Vista! Perhaps that will come later--I don't know. Before you get too far into copying photos you may notice, as I did, that they are very dirty. You should have something like a soft brush available to clean dust and dirt off the slides and negatives. I was using a clean shaving brush but my son told me that it is horsehair and will scratch the film so you should use something softer. After you load the Photo Impressions 6 software on your computer, clicking its icon on your screen will bring up the software. The initial screen allows you to: - 1. copy from Camera/storage device, or - 2. Acquire from Scanner Having made the appropriate choice, click on number 2. Acquire above and the acquisition screen will appear. You then manually slide the film holder into the scanner, center it and after the image has stopped changing click Snapshot to acquire the image and then Transfer to capture the image in memory. You then proceed to copy several photos clicking on Snapshot and Transfer for each slide or negative. Although there is a format choice allowing selection of a range from 2592 x 1680, through 2048 x 1536 down to 320 x 240, only the largest choice was active and I could not choose to capture the images in a smaller size at this point. As you move a slide or negative into the viewing screen you will notice that the image often changes over the first five or ten seconds as the software tries to adjust to the correct exposure. When this procedure has stopped click Snapshot to selectc the image then Transfer to save it. |
After you have captured several slides, usually twenty-five or thirty, you can click on Exit and the images in memory will be saved to disk and will show up on your screen.
At this point you select an image and enter the Edit mode which allows you to crop the image to eliminate black edges caused by the frame, or possibly to eliminate portions of the image that are blurred, discolored or otherwise undesirable. The images are numbered by the software using today's date and a numerical sequence. You can change that to anything you like. If you modify an image but want to save the original you can simply rename the modification to a different name or number when saving it. You can use the Healing Brush which allows you to get rid of specks, hairs or blotches that show up on the image. There is also a cloning tool and several others which I have not yet had the chance to try. The software allows you to zoom in to the pixel level, so there is great deal of flexibility in editing out such items. And if the color is not quite right you can adjust that as well by using the color palette. There is a selection to send an e-mail and attach an image to it. Here you can select a smaller size than the largest image captured. However, unless I missed something you can send only one image per e-mail. There also seems to be a capability to resize an image after it has been captured but I haven't had time to try that yet. No Additional Program Necessary I noticed that in Carl Tenning's presentation that he needed to use an external program to manipulate his images after they were captured. He used Compupic and that is fine. The package described here include editing software with the scanner to perform the editing and enhancement changes. Problems In general, the software/hardware combination worked quite well. Since most of us are amateur photographers, we often may be working with an image that wasn't very good to start with. With this software you may be able to improve it a bit by using the editing function. Simply by darkening an unacceptably overexposed photo you can often improve it to make it worth saving. However, all problems are not as easily solved. I don't know why, but in some color negative photos that contained objects with dark shadows, the dark almost black, shaded areas were produced as deep red! In most cases a lot of work would be required to make such image acceptable. This occurred only on color negatives and only on a small percentage of the pictures but some of those affected were good photos that were otherwise worth keeping. A minor annoyance was that the sprocket holes on my color negatives were not on a 1:1 relationship with the teeth in the holding frame, so I had to adjust the film manually to fit the frame properly. No big deal! Question: A question asked after the presentation was whether or not you could copy Kodachrome transparencies which were not mounted in a cardboard frame. The answer is yes if you place them in the holder normally used for color negatives but select Slides before copying to tell the program you are processing color transparencies. Incidentally, even though the system was designed to copy color film, it can also be used to copy black and white positives and negatives. It is also possible to copy pictures from a scanner and manipulate the images using the editing software. Items not mentioned Touchup tools not demonstrated besides the Healing Brush include tools to Clone, Lighten/Darken, Smudge, Sharpen or Blur a section of an image. There are also Paint tools - a brush size and color, line width, transparency and an Eraser. There are probably other features that I haven't come across yet. It appears to be a fairly complete package. Concluding comment by Carl Tenning What was especially interesting to me was the difference in technology between our two scanners. Mine was the older technology that used a stepper motor to drive the line-by-line scanner head, similar to the conventional flatbed scanner. Bob's appeared to work more like the way a digital camera senses the image, viewing the entire image at once. |
|
Number 302 - July 2008
|
|